
|
|

|
|
|
|
Welcome to the Australian Ford Forums forum. You are currently viewing our boards as a guest which gives you limited access to view most discussions and inserts advertising. By joining our free community you will have access to post topics, communicate privately with other members, respond to polls, upload content and access many other special features without post based advertising banners. Registration is simple and absolutely free so please, join our community today! If you have any problems with the registration process or your account login, please contact us. Please Note: All new registrations go through a manual approval queue to keep spammers out. This is checked twice each day so there will be a delay before your registration is activated. |
|
|||||||
 |
|
|
Thread Tools | Display Modes |
 01-01-2007, 12:31 PM
|
#31 | ||
|
FF.Com.Au Hardcore

Join Date: Sep 2005
Location: Belmont, WA
Posts: 1,301
|
Can you give a quick run down mate?
|
||

|

|
|
01-01-2007, 12:42 PM
|
#32 | ||
|
FF.Com.Au Hardcore

Join Date: Apr 2006
Location: Australia
Posts: 1,452
|
Good work GK! When I did mine I just used a small screwdriver to push down on the clips and sort of worked it back from there. I also had to sort of pry it by sticking it in under the end and levering it up and over the clips a little. It's probably lucky I didn't break the plastic, but it worked at the time!
|
||
|
|
|
|
01-01-2007, 01:09 PM
|
#33 | ||
|
Regular Member
Join Date: Sep 2006
Location: wrong side of town
Posts: 174
|
Well done George,cant wait for you to have a crack at the wagon,I,ve got a s3 and need all the help I can get.
(another) George :MrT_anim: |
||
|
|
|
|
01-01-2007, 04:17 PM
|
#34 | ||
|
Walking with God

Join Date: Mar 2005
Location: Melbourne
Posts: 7,321

|
I'm typing it up now on Word and I'll post it shortly. The full version (or updated version - hopefully with some good pics) will be posted on my Futura workshop thread in the next few days.
Cheers, GK
__________________
2009 Mondeo Zetec TDCi - Moondust Silver 2015 Kia Sorento Platinum - Snow White Pearl 2001 Ducati Monster 900Sie - Red Now gone! 1999 AU1 Futura Wagon - Sparkling Burgundy On LPG Want a Full Life? John 10:10 |
||
|
|
|
|
01-01-2007, 04:52 PM
|
#35 | |||
|
99 AU Futura

Join Date: Dec 2005
Location: Melbourne
Posts: 30
|
Quote:
__________________
I am not young enough to know everything |
|||
|
|
|
|
01-01-2007, 04:55 PM
|
#36 | ||
|
Walking with God
Join Date: Mar 2005
Location: Melbourne
Posts: 7,321
|
Just finished the write up with a diagram using the Word drawing tools. Unfortunately I can post the diagram up with the how to.
Anyone know how to get around this? I don't really want to do the diagram all over again if I can help it! Just got the diagram into Microsoft paint and I'll see how I go from there! LOL! GK
__________________
2009 Mondeo Zetec TDCi - Moondust Silver 2015 Kia Sorento Platinum - Snow White Pearl 2001 Ducati Monster 900Sie - Red Now gone! 1999 AU1 Futura Wagon - Sparkling Burgundy On LPG Want a Full Life? John 10:10 |
||
|
|
|
|
01-01-2007, 05:07 PM
|
#37 | ||
|
Walking with God
Join Date: Mar 2005
Location: Melbourne
Posts: 7,321
|
HOW TO CHANGE FUEL FILTER
Tools / equipment needed: Correct filter** 15 and 19mm open ended spanners. WD40 or equivalent lube 2 Small flat-bladed screwdrivers. 1. park car on flat concrete. Remove fuel pump relay from the fuse bank under the bonnet. Turn the car over for a few short bursts to get rid of excess juice from the line. (Thanks here to bodes-sh and TwistedEL) 2. Jack rear of car up and support on safety stands. I used the factory jack which works very well. 3. Spray nut and allow lube to penetrate. I couldnt believe how tight the nut was done up! 4. Undo the nut end of the filter first, as this will allow you to pull the filter out of its holder/bracket, giving you the ability to move it around, helping you get it into a better position and enabling you to get a good hold of it. (Fuel will come out of the line, but not too much) 5. The clip can be undone using 2 small flat blade screwdrivers to prise back (gently though) the clips on the connector. Basically what you have to do is gently insert the 2 screwdrivers into the connector along either side of the shaft of the filter to prise apart the plastic locking ring/o-ring type mechanism (demonstrated by the 2 thicker arrows on the diagram). This plastic locking ring grips the shaft and I think latches onto the part Ive labelled stopper / ridge and so must be held back to allow the filter to be pulled out. Gently does it though, not much force is needed, but the force must be directed in the right area. This crude diagram gives you a basic idea of how it all fits together. The connector snap fits onto the pipe of the filter, coming to a stop on the part Ive labelled stopper/ridge. Actually the stopper is inside of the connector.  The bottom diagram is a rough cross section of the connector, which attempts to give an understanding of the o ring needing to be prised apart! Its indicated by the arrows. Using the screwdrivers to gently pushing this inner plastic ring aside or prise it apart allows the filter to be pulled out. 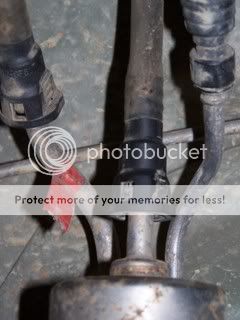 And an actual pic of the filter and connector probably helps too! If you think I've missed something or made an error, feel free to comment and I'll fix it up for the next edition to be posted on one of my workshop threads in a few days time. Cheers, GK
__________________
2009 Mondeo Zetec TDCi - Moondust Silver 2015 Kia Sorento Platinum - Snow White Pearl 2001 Ducati Monster 900Sie - Red Now gone! 1999 AU1 Futura Wagon - Sparkling Burgundy On LPG Want a Full Life? John 10:10 Last edited by GK; 01-01-2007 at 06:06 PM. |
||
|
|
|
| 5 users like this post: |
|
01-01-2007, 05:34 PM
|
#38 | ||
|
FF.Com.Au Hardcore
Join Date: May 2006
Location: Perth, South
Posts: 3,064
|
good write up GK, about the only thing i think you need to change is the flow direction on your diagram, i'm pretty sure it goes in that hose end first
|
||
|
|
|
|
01-01-2007, 05:59 PM
|
#39 | |||
|
Walking with God
Join Date: Mar 2005
Location: Melbourne
Posts: 7,321
|
Quote:
GK
__________________
2009 Mondeo Zetec TDCi - Moondust Silver 2015 Kia Sorento Platinum - Snow White Pearl 2001 Ducati Monster 900Sie - Red Now gone! 1999 AU1 Futura Wagon - Sparkling Burgundy On LPG Want a Full Life? John 10:10 |
|||
|
|
|
|
01-01-2007, 06:14 PM
|
#40 | ||
|
Walking with God
Join Date: Mar 2005
Location: Melbourne
Posts: 7,321
|
HOW TO CHANGE FUEL FILTER
Tools / equipment needed: Correct filter** 15 and 19mm open ended spanners. WD40 or equivalent lube 2 Small flat-bladed screwdrivers. 1. park car on flat concrete. Remove fuel pump relay from the fuse bank under the bonnet. Turn the car over for a few short bursts to get rid of excess juice from the line. (Thanks here to bodes-sh and TwistedEL) 2. Jack rear of car up and support on safety stands. I used the factory jack which works very well. 3. Spray nut and allow lube to penetrate. I couldnt believe how tight the nut was done up! 4. Undo the nut end of the filter first, as this will allow you to pull the filter out of its holder/bracket, giving you the ability to move it around, helping you get it into a better position and enabling you to get a good hold of it. (Fuel will come out of the line, but not too much) 5. The clip can be undone using 2 small flat blade screwdrivers to prise back (gently though) the clips on the connector. Basically what you have to do is gently insert the 2 screwdrivers into the connector along either side of the shaft of the filter to prise apart the plastic locking ring/o-ring type mechanism (demonstrated by the 2 thicker arrows on the diagram). This plastic locking ring grips the shaft and I think latches onto the part Ive labelled stopper / ridge and so must be held back to allow the filter to be pulled out. Gently does it though, not much force is needed, but the force must be directed in the right area. This crude diagram gives you a basic idea of how it all fits together. The connector snap fits onto the pipe of the filter, coming to a stop on the part Ive labelled stopper/ridge. Actually the stopper is inside of the connector. 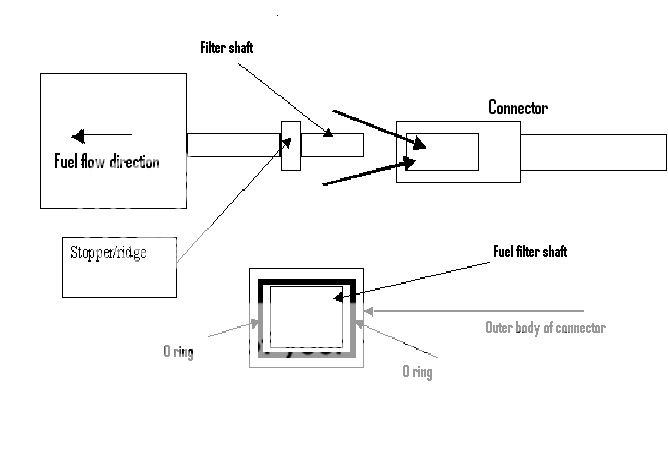 The bottom diagram is a rough cross section of the connector, which attempts to give an understanding of the o ring needing to be prised apart! Its indicated by the arrows. Using the screwdrivers to gently pushing this inner plastic ring aside or prise it apart allows the filter to be pulled out. And an actual pic of the filter and connector probably helps too! GK
__________________
2009 Mondeo Zetec TDCi - Moondust Silver 2015 Kia Sorento Platinum - Snow White Pearl 2001 Ducati Monster 900Sie - Red Now gone! 1999 AU1 Futura Wagon - Sparkling Burgundy On LPG Want a Full Life? John 10:10 |
||
|
|
|
|
01-01-2007, 09:20 PM
|
#41 | ||
|
AULTD

Join Date: Mar 2005
Location: Langwarrin
Posts: 818
|
Why didn't the tool work George?
It looks as though it should have done the job of the two screwdrivers. I still wonder why some models have this type of clip and others have the easier screw on type. |
||
|
|
|
|
01-01-2007, 11:00 PM
|
#42 | |||
|
Walking with God
Join Date: Mar 2005
Location: Melbourne
Posts: 7,321
|
Quote:
I'm not sure why they designed them as such, only that for gas and IRS models, the filters were different from the non gas live rear end set ups! Go figure! GK
__________________
2009 Mondeo Zetec TDCi - Moondust Silver 2015 Kia Sorento Platinum - Snow White Pearl 2001 Ducati Monster 900Sie - Red Now gone! 1999 AU1 Futura Wagon - Sparkling Burgundy On LPG Want a Full Life? John 10:10 |
|||
|
|
|
|
02-01-2007, 04:41 PM
|
#44 | ||
|
AU3 Winged Windsor

Join Date: Apr 2006
Location: Melbourne
Posts: 457
|
can some one tell me if when u round the nut on the fuel line weather you can get a new nut and attach it to the fuel line or do i need a whole new fuel line.
|
||
|
|
|
|
02-01-2007, 05:11 PM
|
#45 | ||
|
FORD TOUGH

Join Date: Jan 2007
Location: Cranbourne East VIC
Posts: 141
|
you can replace the nuts, but you need a flaring tool....
|
||
|
|
|
|
02-01-2007, 05:16 PM
|
#46 | ||
|
AU3 Winged Windsor
Join Date: Apr 2006
Location: Melbourne
Posts: 457
|
thanks for that mate
|
||
|
|
|
|
03-01-2007, 08:04 AM
|
#47 | |||
|
Walking with God
Join Date: Mar 2005
Location: Melbourne
Posts: 7,321
|
Quote:
GK
__________________
2009 Mondeo Zetec TDCi - Moondust Silver 2015 Kia Sorento Platinum - Snow White Pearl 2001 Ducati Monster 900Sie - Red Now gone! 1999 AU1 Futura Wagon - Sparkling Burgundy On LPG Want a Full Life? John 10:10 |
|||
|
|
|
|
03-01-2007, 11:36 AM
|
#48 | ||
|
AU3 Winged Windsor
Join Date: Apr 2006
Location: Melbourne
Posts: 457
|
^^^^^^^yeah same here it was like it was seized in there
|
||
|
|
|
|
03-01-2007, 06:03 PM
|
#49 | ||
|
Back in a Blue Oval

Join Date: May 2005
Location: Karratha WA
Posts: 707
|
i made the mistake of purchasing the wrong filter first
 but was all good when i realised anyways. The nut on mine was also tight but my clip was easy to do, by pushing the hose towards the filter then wiggling it off would you believe! all up though, including putting the car up on ramps, took me 30 mins. not nearly as long as changing my leads!!!
__________________
'13 Territory TX Diesel RWD. The Family Bus '08 Mitsubishi Pajero. The Off-road Machine |
||
|
|
|
|
03-01-2007, 07:53 PM
|
#50 | |||
|
Walking with God
Join Date: Mar 2005
Location: Melbourne
Posts: 7,321
|
Quote:
I figure you were pulling the filter away from the clamp? These tips might save me some trouble next time! LOL! GK
__________________
2009 Mondeo Zetec TDCi - Moondust Silver 2015 Kia Sorento Platinum - Snow White Pearl 2001 Ducati Monster 900Sie - Red Now gone! 1999 AU1 Futura Wagon - Sparkling Burgundy On LPG Want a Full Life? John 10:10 |
|||
|
|
|


 Linear Mode
