
|
|

|
|
|
|
Welcome to the Australian Ford Forums forum. You are currently viewing our boards as a guest which gives you limited access to view most discussions and inserts advertising. By joining our free community you will have access to post topics, communicate privately with other members, respond to polls, upload content and access many other special features without post based advertising banners. Registration is simple and absolutely free so please, join our community today! If you have any problems with the registration process or your account login, please contact us. Please Note: All new registrations go through a manual approval queue to keep spammers out. This is checked twice each day so there will be a delay before your registration is activated. |
|
|||||||
| OzECruisers General Discussions E/N/D vehicles General Discussion ONLY. NO TECH THREADS |
 |
|
|
Thread Tools | Display Modes |
 05-03-2007, 09:07 PM
|
#1 | ||
|
FF.Com.Au Hardcore
Join Date: Apr 2005
Posts: 664
|
Part 1 is removal of the auto. Part 2 (this one) is the installation of the manual, and getting it driveable. Part 3 covers the finishing touches, like killing that thermofan and stopping the fault codes, and limp home mode.
Part 2: Installing the Manual. Step 1: Arrange goodies. So after you have removed the automatic, the parts not attached to the car should include an auto, a flex plate, a shifter, some interior plastics, a tailshaft, and a pair of trans cooler lines. The parts to go in should include a gearbox, clutch/flywheel assembly, a manual wiring loom (easily made from an auto loom if you dont have it), a pedal (and pin), clutch cable, and once again a tailshaft. It doesnt hurt to remove the bellhousing from the transmission now too.  Step 2: Install pedal After making up a pin that looks like this (or sending away for a pin kit from Mal Wood in Warwick) you should bolt that into your pedal box in a hole next to where the brake pedal pin is. You can now install the pedal itself, remembering to install the nylon bush. The clutch cable simply pokes through the firewall near the brake booster (it has a tube on it, you will recognise it) and comes out near the pedal. The other end of the cable hooks into that elongated d clip that goes on the pedal, the hard bushes will need to come out for this. After the cable is in the clip, the bushes are re inserted into the clip and then it is slid onto the pedal. The R clip from the gearbox end of the shifter relay rod fits nicely to hold the whole lot in place.    Step 3: Clutch and flywheel installation. First up inspect them, if they look anything like mine, go over them with a wire wheel (lightly on the clutch, heavy as you desire on the metal), then go over everything with sandpaper. If you can close your eyes and feel the rusty spots, sand some more. After they feel smooth, they are ready.   The spigot bearing is a snap to install. Get a socket the same (or slightly smaller) as the outside of the bearing. Gently tap the bearing into place in the centre of the crankshaft. The flywheel can be slid onto the end of the crankshaft, and all the bolts hand tightened. If two dont go in, its ok, just make the two line up (one hole is out on the crank, and another on the flywheel, when they line up, there is no problem) by removing the bolts and spinning the flywheel on the crank. Hold on tight, its heavy and has sharp edges. Tighten the bolts fully (I used our ¾ drive rattle gun, but not at full power and not for very long, stripping the crank thread would be a very painful exercise).  Now you can install the pressure plate. The thick side of the clutch centre goes towards the pressure plate, getting this wrong is a bad thing. The pressure plate is now hand tightened. Note that I have an EA/EBI style clutch and flywheel. Ideally you will have an EBII onwards 6 bolt clutch. If you have a spare input shaft, pull it out of the cupboard now, and put it through the clutch into the spigot bearing. I didnt have one, so I had to line up by eye. I missed (more on the solution later). Tighten the clutch bolts fully.  Step 4: Install Bellhousing. Now the entire bell housing and everything attached to it, goes on. Start with the 6 bolts that go into the block, these are the same as the auto ones. Then put the two upper bolts that hold the inspection cover on, then reattach the block-bellhousing braces. The starter motor can also be attached. Run the clutch cable behind the drivers engine mount, and underneath the engine, and connect it to the clutch fork. You now have a start-able car. Dont, under any circumstances, press the clutch pedal, yet.  Step 5: Manual Loom. Remove your automatic speedo sender, and install it into your manual box, unless you are changing the final drive ratio, in which case keep the speedo sender for that diff (or at the least, the gear, as the gear in an E-Series falcon depends solely on the rear axle ratio). Remove the auto loom. There are two plugs at the back of the manifold, one is round and large, and the other is flat and wide. The manual loom plugs into the flat plug. The plugs at the other end can wait.  Step 6: Install Gearbox. The fun bit. Remove your spare input shaft now if you didnt when you did the bellhousing. Also take the shifter extension off the gearbox. Get your jack, and put the gearbox on it, and jack it up to clutch height, with the two bellhousing-gearbox surfaces parallel. If you lined up the clutch properly, pushing the gearbox towards the engine (minor jiggling involved) should result in you being able to re-attach the gearbox and bellhousing. If not (like me), this becomes a painful exercise. My solution was to get a friend to step on the clutch pedal while I did some major jiggling of the gearbox. Only when the input shaft was in the spigot bearing and the first bolt was in was the clutch released. After you have done up the four gearbox-bellhousing bolts, you can now move on to the crossmember. Jack the gearbox up further, and re-use the old crossmember bolts.  Step 7: Tailshaft, and More Wiring. Push the (same as auto) tailshaft into the rear of the gearbox, and then bolt up the tailshaft. The plugs that we didnt plug in earlier can now go on. The two plugs that are closest to the engine (ie have shorter wires) go to the switch on top of the gearbox. This is the neutral starter lockout. The other two similar plugs go to the lower switch; this controls the reverse lights. The three-pin plug goes to the speedo sender. Step 8: Oil There are a few ways to do this; a plunger type pump is the best. I had to make do with a hose and a funnel. The hose went from the cabin, down beside the shifter, and into the hole half way up the gearbox. A plug that needs a hex key usually occupies this hole. 1.9 litres of Dextron III and 150ml of lubrizol later, your car has gearbox oil. Step 9: Interior. Reinstall everything you removed in Part 1, except the auto shifter surround. You can now re-attach the shifter extension. Adjust the clutch too, by pulling on the cable at the firewall end and turning the nut. Ideal hight is brake pedal hight, if not slightly higher. You can now lower the car, and re-install the battery. The car is now driveable again, but in limp home mode. No extra lights will be on the dash, and the economy light will never be seen again (except on key-on, for about a ¼ of a second). Part 3 will cover limp home mode, shift boot installation, and some other electricals. There is now no more greasy work. |
||

|

|
|
06-03-2007, 10:00 AM
|
#2 | ||
|
Regular Member
Join Date: Dec 2005
Posts: 205
|
good work mate
|
||
|
|
|
|
06-03-2007, 10:02 AM
|
#3 | ||
|
EBII XR6

Join Date: Jul 2006
Location: Bendigo. Victoria
Posts: 5,278

|
Hold cr@p thats an awesome tutioral! Well done! Not sure if its been suggested but would these be useful in the Tech Pages on deleted link? Or even just sticky's here on the forums?
__________________
DEVLXR
|
||
|
|
|
|
06-03-2007, 11:08 AM
|
#4 | ||
|
FF.Com.Au Hardcore
Join Date: Apr 2005
Posts: 664
|
yeah its pretty good.
Incidentally the limp home mode wasnt a problem, reconnecting the vaccum line to the map sensor fixes the black smoke and poor running issue. After going for my happy lap, it appears that 4th synchro is, umm, rooted. 3rd is on its way out, and the car can randomly stall. Goes hard though. I am hoping the stalling issues will be sorted out with a resistor pack connected to the gearbox loom. When I get paid, its off to the wreckers in search of a gearshift boot. Ford don't make the vinyl top one any more (or brackets to suit), so I may have to send away for it. $15 gets you the rubber one that gas-proofs the gaping hole in your floor. |
||
|
|
|
|
06-03-2007, 05:19 PM
|
#5 | ||
|
FF.Com.Au Hardcore
Join Date: Apr 2005
Posts: 664
|
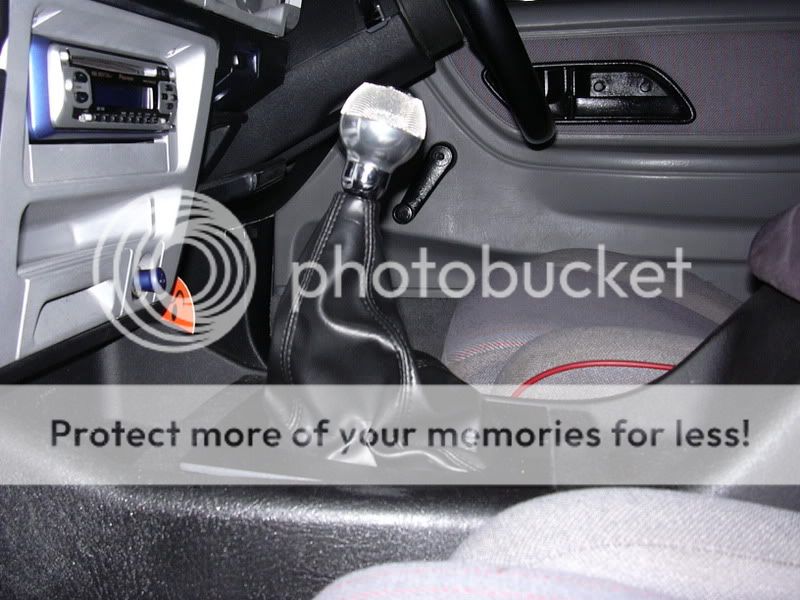
Hmm well it seems the bracket ford don't make is the one that holds the rubber boot down (the one that seals the hole). The bracket is the same from EA-EL, so it shouldnt be too hard to find. The rubber boot is available from for brand new for $15, and the vinyl shifter boot (the one you see from the inside of the car) is $60 for it and the clips that it uses to go into the centre console.
Tomorow my rubber boot arrives, and I will fit it, along with an EA clamp/bracket. As for the computer side of things, an EF Manual computer appears to be really hard to get brand new, the only real option is getting it from a wrecker. Other than that the local dyno shop can fit an expansion board (plug-in, or piggyback chip) to my ECU, and retune it for me. He also mentioned (after showing him this thread) that I really should have got the flywheel machined, something I neglected to think about, at $40, its cheap. I have found out how to pull the fault codes without a scantool, so I will be doing that to check to see if I have done everything (electriconally) correct. Part 3 will have a detailed discription of all of this work, along with little things like fitting the spring to the clutch pedal, and resizing the automatic brake pedal. The making of the load bank to simulate the auto transmission will also be covered, if it ends up being successful. I really don't want to stop until I have a perfectly functioning car with no fault codes. Incedentally my gearbox is faulty, so I will probably be describing some rattles that you may or may not have. cya Ben |
||
|
|
|
|
06-03-2007, 05:23 PM
|
#6 | ||
|
EBII XR6
Join Date: Jul 2006
Location: Bendigo. Victoria
Posts: 5,278
|
You talking about this vinyl boot cover?
 Get it off ebay for under $50.
__________________
DEVLXR
|
||
|
|
|
|
06-03-2007, 05:24 PM
|
#7 | ||
|
FF.Com.Au Hardcore
Join Date: Apr 2005
Posts: 664
|
yeah, but for an EF
|
||
|
|
|
|
06-03-2007, 06:44 PM
|
#8 | ||
|
Smash the Boost

Join Date: Jan 2005
Location: Brisbane
Posts: 2,692
|
I have been told by Mal Wood its best to set the clutch take up point one inch from the floor to help prevent pedal box and firewall collapse. I have a pin and it will eventually bend the auto pedal box (have seen it before)
I also routed my clutch cable in front of the engine mount. It makes it susceptible to the heat from the pacemakers but its a lot better in terms of pedal effort. I think u may have also forgot to mention the dust cap for the throwout lever
__________________
2023 Hyundai Palisade 1971 Fairmont Sedan 1974 SWB F100 Keyboard Warrior - A Person who, being unable to express his anger through physical violence (owning to their physical weakness, lack of bravery and/or conviction in real life), instead manifests said emotions through the text-based medium of the internet, usually in the form of aggressive writing that the Keyboard Warrior would not (for reasons previously mentioned) be able to give form to in real life.
|
||
|
|
|
|
06-03-2007, 10:03 PM
|
#9 | ||
|
FF.Com.Au Hardcore
Join Date: Apr 2005
Posts: 664
|
Dust cap? I didnt have anything of the sort. Maybe the dust cap stops it from rattling as well. I did have a rattle from the clutch fork from about 1800-3200 rpm, which went whan I connected the clutch pedal spring. My cable wasnt long enough to go in front of the mount without being at a strange angle (i think thats it, I did have a good reason why I didn't). I used an EBI wagon cable, which is probably different to an EFII sedan item.
Incedentally even when fitting the incorrect shifter boot (EA brackets do not fit my car, although the ford guy said they did) it makes an insane difference to the feel of the car. It doesnt drive any different, but there are no more noises or hot gases, and the gearstick actually stays cooler around the base too. cya Ben |
||
|
|
|
|
06-03-2007, 10:41 PM
|
#10 | ||
|
Smash the Boost
Join Date: Jan 2005
Location: Brisbane
Posts: 2,692
|
i have some sort of rubber boot in my car but it doesnt do the job too well. Im needing to find someone who can do a custom item in brown/tan suede as the fairmont is cappuchino inside.
__________________
2023 Hyundai Palisade 1971 Fairmont Sedan 1974 SWB F100 Keyboard Warrior - A Person who, being unable to express his anger through physical violence (owning to their physical weakness, lack of bravery and/or conviction in real life), instead manifests said emotions through the text-based medium of the internet, usually in the form of aggressive writing that the Keyboard Warrior would not (for reasons previously mentioned) be able to give form to in real life.
|
||
|
|
|
|
07-03-2007, 07:46 AM
|
#11 | ||
|
rofl copter

Join Date: Aug 2005
Location: Werribee
Posts: 3,692
|
the gearboots for ef/el are no more then 50 from ebay and no more then 70 from ford iirc
__________________
GQ patrol.
.... thats all |
||
|
|
|
|
07-03-2007, 10:04 AM
|
#12 | ||
|
Tuned @ Pitlane Frankston

Join Date: Aug 2006
Location: S.E Suburbs, Melbourne
Posts: 1,879
|
Good tute, but get the flywheel machined, not just sanded.
and also, you can't leave the brake pedal like that. Make sure you hacksaw the brake pedal down to the right size, then fit a rubber brake pedal cover..
__________________
BA MKII XR6 Turbo, 6sp Manual - Vibe purple, Premium sound, Sports leather, BA XR8 wheels, Koni adjustable suspension, Nizpro v/springs, Walbro in-tank pump, Siemens 60lb injectors, Process West stage 1 intercooler, Mal Wood 11" Option 3 clutch, Tripod gauges, Custom Mainlube T56 gearbox oil, ETM turbo oil feed line, Typhoon intake, BMC Panel filter, Turbosmart BOV, Tuned by Pit Lane Performance - 300.4rwkw @ 12psi
Last edited by shuresm58; 07-03-2007 at 10:31 AM. |
||
|
|
|
|
07-03-2007, 05:34 PM
|
#13 | ||
|
Smash the Boost
Join Date: Jan 2005
Location: Brisbane
Posts: 2,692
|
hahaha
i left my brake pedal as is for 6 months, no issues. Only cut it down because i had a brand new hacksaw one arvo and thought i'd kill some time. it does look pretty bad though
__________________
2023 Hyundai Palisade 1971 Fairmont Sedan 1974 SWB F100 Keyboard Warrior - A Person who, being unable to express his anger through physical violence (owning to their physical weakness, lack of bravery and/or conviction in real life), instead manifests said emotions through the text-based medium of the internet, usually in the form of aggressive writing that the Keyboard Warrior would not (for reasons previously mentioned) be able to give form to in real life.
|
||
|
|
|
|
07-03-2007, 08:37 PM
|
#14 | ||
|
FF.Com.Au Hardcore
Join Date: Apr 2005
Posts: 664
|
Yeah, that will be covered in part 3. All part 1 and 2 are for is to get your car driveable as a manual. Part 3 is brake pedal, clutch spring, both gearshift boots, the electronic mods required to kill fault codes, clutch pedal switch (for cruise control) etc. When I post that, it will be with the other parts, a start-finish guide on how to have a T5 in your EF Falcon, that looks and drives standard, and hopefully has no fault codes. The other parts will also be updated with information I have only recently found out, or is optional (such as the installation of a manual pedal box, if I can find out how it is done).
Next in my 'How To' series is either a head gasket, or an engine swap, depending on exactly how bad my engine is (which will be discovered only after the head is removed). cya Ben *** I got both shift boots, the rubber sealing one and the pretty vinyl one from Ford on order. $80-ish. get them on thursday arvo/friday morning. Hopefully my gearbox simulator (read: resistor load bank for gearbox loom, EVERYTHING, not just gear position and temp) will be finished friday arvo. After that, the pedal gets cut, filed, and painted, and the conversion will be complete, pending the fault code results. |
||
|
|
|
|
07-03-2007, 09:57 PM
|
#15 | ||
|
Smash the Boost
Join Date: Jan 2005
Location: Brisbane
Posts: 2,692
|
what are the intentions of mounting to cruise cutoff switch? you'll need a mounting boss, it works the same as the brake pedal switch
__________________
2023 Hyundai Palisade 1971 Fairmont Sedan 1974 SWB F100 Keyboard Warrior - A Person who, being unable to express his anger through physical violence (owning to their physical weakness, lack of bravery and/or conviction in real life), instead manifests said emotions through the text-based medium of the internet, usually in the form of aggressive writing that the Keyboard Warrior would not (for reasons previously mentioned) be able to give form to in real life.
|
||
|
|
|
|
07-03-2007, 10:19 PM
|
#16 | ||
|
FF.Com.Au Hardcore

Join Date: Jan 2005
Location: NSW Central Coast
Posts: 1,266
|
you put Dex3 in your T5???
thats Auto tranny fluid! i put gear oil in mine...should i change it to Dex3??? |
||
|
|
|
|
08-03-2007, 07:35 PM
|
#17 | ||
|
FF.Com.Au Hardcore
Join Date: Apr 2005
Posts: 664
|
Dextron III and 150ml of lubrizol is the factory reccomended fluid for a T5. That or Transmax Z (fully synthetic), also with 150ml of lubrizol.
The clutch switch? I intend to copy the EB switch mount, and probably bolt it (with suitable holes drilled) onto a similar spot. If I can find an EF pedal box, I would prefer to copy that mount. The switch has the same effect as pressing the coast/resume button, but can only put the cruise control into coast mode. It is so that the revs don't climb during gearchanges with the cruise control active. cya Ben |
||
|
|
|
|
08-03-2007, 09:56 PM
|
#18 | ||
|
Smash the Boost
Join Date: Jan 2005
Location: Brisbane
Posts: 2,692
|
bah having the car rev to redline everytime u depress the clutch is fun

__________________
2023 Hyundai Palisade 1971 Fairmont Sedan 1974 SWB F100 Keyboard Warrior - A Person who, being unable to express his anger through physical violence (owning to their physical weakness, lack of bravery and/or conviction in real life), instead manifests said emotions through the text-based medium of the internet, usually in the form of aggressive writing that the Keyboard Warrior would not (for reasons previously mentioned) be able to give form to in real life.
|
||
|
|
|
|
08-03-2007, 11:22 PM
|
#19 | ||
|
rofl copter
Join Date: Aug 2005
Location: Werribee
Posts: 3,692
|
just remember to touch the brake before clutching in if cruise is on
__________________
GQ patrol.
.... thats all |
||
|
|
|
|
09-03-2007, 12:01 AM
|
#20 | |||
|
FF.Com.Au Hardcore
Join Date: Sep 2005
Location: Brisbane
Posts: 3,568
|
Quote:
|
|||
|
|
|
|
09-03-2007, 01:12 PM
|
#21 | ||
|
Tuned @ Pitlane Frankston
Join Date: Aug 2006
Location: S.E Suburbs, Melbourne
Posts: 1,879
|
I did something stupid the other day. I was coasting in neutral and accidently hit the set button for cruise, and the car started to rev all the way to 7000rpm. (was on LPG so no rev limiter).
I **** myself to say the least..
__________________
BA MKII XR6 Turbo, 6sp Manual - Vibe purple, Premium sound, Sports leather, BA XR8 wheels, Koni adjustable suspension, Nizpro v/springs, Walbro in-tank pump, Siemens 60lb injectors, Process West stage 1 intercooler, Mal Wood 11" Option 3 clutch, Tripod gauges, Custom Mainlube T56 gearbox oil, ETM turbo oil feed line, Typhoon intake, BMC Panel filter, Turbosmart BOV, Tuned by Pit Lane Performance - 300.4rwkw @ 12psi
|
||
|
|
|


 Linear Mode
