
|
|

|
|
|
|
Welcome to the Australian Ford Forums forum. You are currently viewing our boards as a guest which gives you limited access to view most discussions and inserts advertising. By joining our free community you will have access to post topics, communicate privately with other members, respond to polls, upload content and access many other special features without post based advertising banners. Registration is simple and absolutely free so please, join our community today! If you have any problems with the registration process or your account login, please contact us. Please Note: All new registrations go through a manual approval queue to keep spammers out. This is checked twice each day so there will be a delay before your registration is activated. |
|
|||||||
 |
|
|
Thread Tools | Display Modes |
 08-02-2010, 07:44 PM
|
#1 | |||
|
AFF Whore

Join Date: Apr 2009
Location: In between gas stations
Posts: 2,246

|
Grandpa_Spec_Aus guide to replacing AU door actuators:
You know that lovely feeling you get when everything just works? Well I wouldnt I own one of the first AU Fairmont Ghias ever produced, and with age, things have started to break left right and centre. So here is a general guide to replacing door actuators, I used one from a Forte and it worked fine so as long as its from an AU there shouldnt be an issue. And before you start, make sure the effing window is wound UP! It will save you a lot of time, effort, head scratching and looking like a complete ****. (Apologies about the bad photos, my good phone met a very wet end, Read: Pool party) 1. Start by removing the cap at the top of the speaker as well as the two caps at the bottom of the door. (Note the 10mm bolt under the cap as well as the bolt behind the door handle surround for later)  2. Remove the Phillips head screws at the bottom of the door where you took off the caps as well as the screw at top of the door above the door actuator. 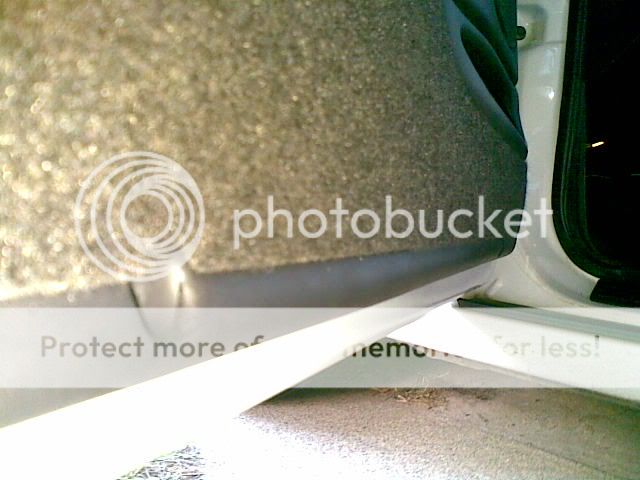 3. Now remove the surround from the door handle, there are two clips at the top you need to press down in order to get it free, however I removed mine with brute force and almost broke it, still, it will come out one way or another :P (See: Forcing the B*****D 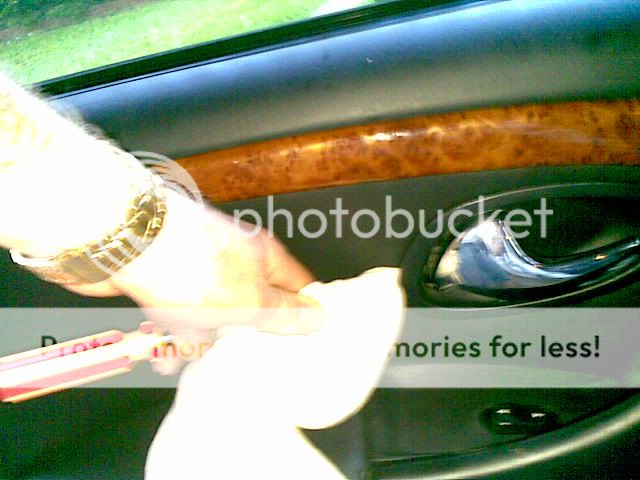 4. Now remove the 10mm bolts as seen in the first picture. 5. Remove the power window unit using a flat bladed screwdriver to leaver it out from the back and disconnect the power cable going to it. 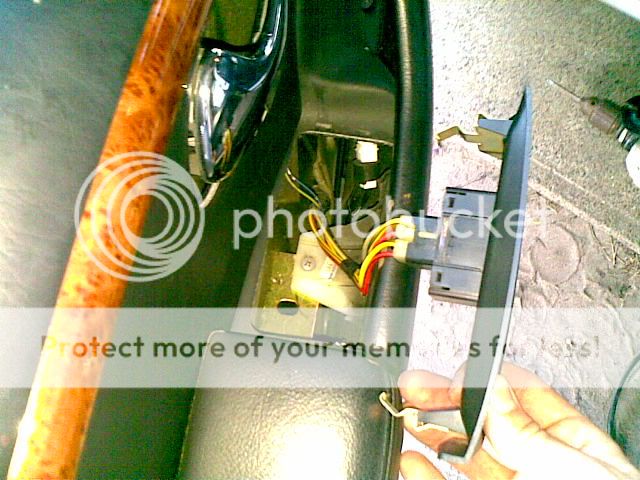 6. Remove the Phillips head screw holding the door trim to the door. 7. Now pull around the edges of the door trim which is held on by clips and pop the trim off, you may need a flat bladed screwdriver for this. (Note: If you have the door lights you will need to carefully pull off the trim and reach around to disconnect the terminal) 8. Pull the soundproofing aside to reveal the door actuator, you will find a cable going to the actuator from the inside door handle, pop the cable out from its anchor point so it can be moved and disconnect this by moving the cable away from the car and sliding it out of the grove. It should slide out without much effort.  9. Now to remove the lower part of the rod that connects the outer door handle. There is a small plastic connector that needs to be removed, slide this about and press it towards the outside of the door, it comes out fairly easily. 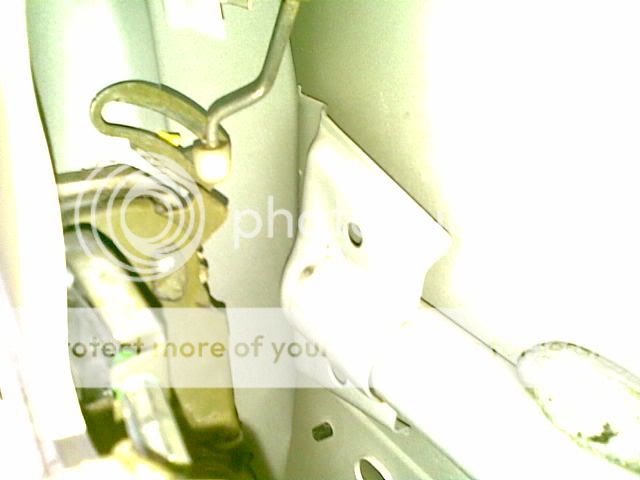 10. Next reach up toward the top of the door, there should be a small back clip holding a metal rod in place, flip the clip upward and then pull the rod free of the clip, remove this and put aside. 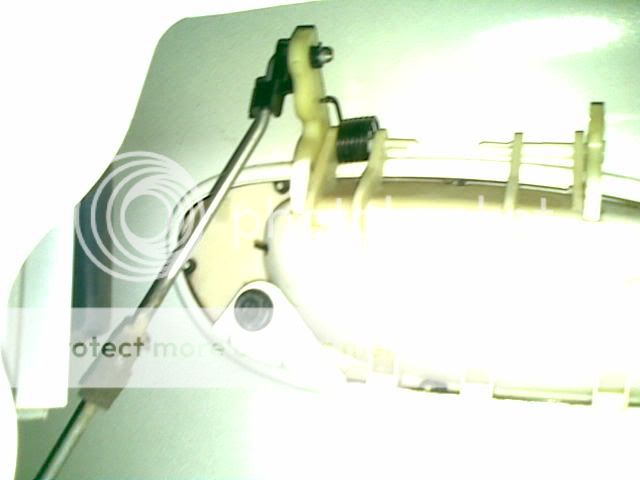 11. There is a cable at the bottom of the door tucked inside which is fastened by a plastic lug which you need to pinch and push back through the door, this makes life easier. 12. Now reach into the door and disconnect the cable from the door to the actuator that you just loosened. 13. Remove the three screws holding the actuator in place. 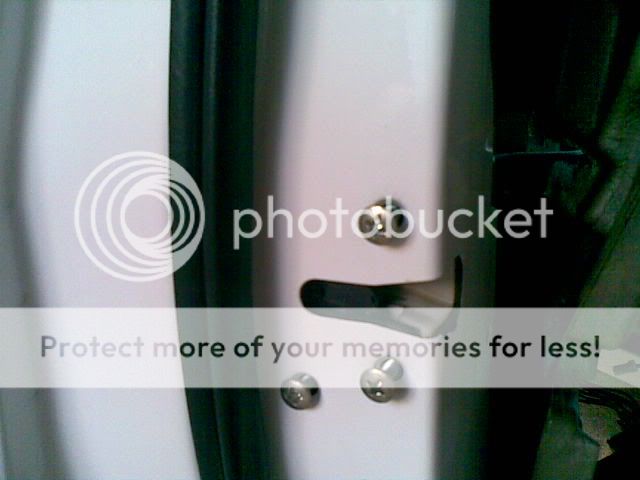 14. Slide the actuator out of the door and put the new one in, loosely do up the screws so that there is a little play, makes getting everything in much easier. Simply reverse the procedure you did to install it and ensure to line up the clips on the door trim with the holes in the soundproofing. 15. Petition Vik to cook me dinner (See: AFF Chefs Corner thread in The Bar) 
__________________
Favorite Quote: Quote:
|
|||

|

|
|
08-02-2010, 08:08 PM
|
#2 | |||
|
AU DIE HARD
  
Join Date: Nov 2005
Location: Between 2nd and 5th gear
Posts: 5,073

|
Great work . another for the how to wall
 ,I am just waiting for the hood ling thread to be completed and I will get them all in at the same time. ,I am just waiting for the hood ling thread to be completed and I will get them all in at the same time.
__________________
........Age and treachery will ALWAYS overcome youth and skill....... CORTINA 250 2V POWER soon to be AUXR8 Windsor pwrd .............WINDSOR WARLORD WHO CARRIES THE CLEVO MAFIA AND BROKEN BOSSES... .........................  ......................... .........................Quote:
|
|||
|
|
|
|
08-02-2010, 10:06 PM
|
#3 | ||
|
Donating Member
Join Date: Aug 2006
Posts: 5,142
|
x2. Definitely sticky material. Big thankyou to Grandpa_Spec_Au.

|
||
|
|
|
|
08-02-2010, 10:54 PM
|
#4 | ||
|
Flairs - Truckers Delight

Join Date: Aug 2006
Location: Brisbane Northside Likes: Opposite Lock
Posts: 5,731
|
well done grandpa_spec_au.
great writeup
__________________
Current: Silhouette Black 2007 SY Ford Territory TX RWD 7-seater "Black Banger"
2006-2016: Regency Red 2000 AUII Ford Falcon Forte Automatic Sedan Tickford LPG "Millennium Falcon" |
||
|
|
|
|
09-02-2010, 10:11 AM
|
#6 | ||
|
Miami Pilot
 
Join Date: Jan 2005
Location: ACT
Posts: 21,703
|
Better write up than the Haynes manual! Top stuff.
__________________
-----------------------------------------------------------------
The Hammer: FG GTE | 376rwkw | 1/4 mile 11.793 @ 119.75mph 1.733 60' (4408lb) 1 of 60 FG MK1 335 GTEs (1 of 118 FG Mk 1 & 2 335 GTEs). Mods: Tune, HSD/ShockWorks, black GT335 19 staggered replicas with 245 & 275/35/19 Michelin Pilot sport 5s Daily: BF2 Fairmont Ghia I6 ZF, machine face GT335 19 staggered Replicas with 245s and 275s, Bilsteins & Kings FPV 335 build stats: <click here> Ford Performance Club ACT |
||
|
|
|
|
09-02-2010, 10:54 AM
|
#7 | |||
|
AFF Whore
Join Date: Apr 2009
Location: In between gas stations
Posts: 2,246
|
Thanks for all the feedback people
One thing I love about these how-to threads on AFF is that they illustrate what needs to be done with photo's to accompany that give a clear idea of what or where the part is that you are after (mostly anyway). I had an old Haynes for my VK commodore and the images were very confusing indeed. P.S. Im not joking about that dinner either :P
__________________
Favorite Quote: Quote:
|
|||
|
|
|
|
05-11-2010, 06:44 PM
|
#8 | ||
|
Starter Motor
Join Date: Oct 2009
Posts: 1
|
Thanx for the great guide, grampa.
My au has been having locking issues..The wrecker I got the actuator from told me i needed a special tool to fit it, so i dropped the car in to a machanic. When I picked it up it still had the same damn problem. It being 4;30 on a friday, the machanic said couldnt he fix it til monday! i don't fancy the idea of not being able to lock my car all weeked so i nipped back to the wreckers and got another actuator, fitted it myself in next to no time (thanks to your guide!). I would've saved myself $70 if I looked here first too. Next time something goes wrong with my beastie I know where to look. BTW you wouldn't happen to have a easy to do, illustrated guide for changing a dif would you? :p xo |
||
|
|
|


 Linear Mode
