
|
|

|
|
|
|
Welcome to the Australian Ford Forums forum. You are currently viewing our boards as a guest which gives you limited access to view most discussions and inserts advertising. By joining our free community you will have access to post topics, communicate privately with other members, respond to polls, upload content and access many other special features without post based advertising banners. Registration is simple and absolutely free so please, join our community today! If you have any problems with the registration process or your account login, please contact us. Please Note: All new registrations go through a manual approval queue to keep spammers out. This is checked twice each day so there will be a delay before your registration is activated. |
|
|||||||
 |
|
|
Thread Tools | Display Modes |
 05-08-2007, 12:51 PM
|
#1 | ||
|
Leeroy
Join Date: Jun 2007
Location: S.E. Melbourne
Posts: 28
|
hi, having just removed my standard cd player, im just wondering if someone knows where the wires on the standard cd player loom go to. (Eg. yellow to battery) if someone has this it could save me quite a few hours :togo:
|
||

|

|
|
05-08-2007, 12:52 PM
|
#2 | |||
|
Back to Le Frenchy

Join Date: Feb 2005
Location: Back home.....
Posts: 13,346
|
You can buy adaptor plugs for most major branded H.U's so that you don't need to cut any wires.
__________________
Quote:
07 Renault Sport Megane F1 Team R26 #1397
|
|||
|
|
|
|
05-08-2007, 01:10 PM
|
#3 | ||
|
Leeroy
Join Date: Jun 2007
Location: S.E. Melbourne
Posts: 28
|
oh ok, im changing speakers and putting in a sub and amp aswell, so im pretty sure im gonig to have to cut and lay wires anyways.....
|
||
|
|
|
|
05-08-2007, 01:25 PM
|
#4 | ||
|
Leeroy
Join Date: Jun 2007
Location: S.E. Melbourne
Posts: 28
|
anybody out there with this info?
|
||
|
|
|
|
05-08-2007, 01:28 PM
|
#5 | |||
|
Back to Le Frenchy
Join Date: Feb 2005
Location: Back home.....
Posts: 13,346
|
Well black will be earth and red is usually power, I can't remember the rest off the top of my head but I have them written down somewhere at home. I'll have a look around later tonight to see if I still have them if someone else hasn't come up with the answer by then.
__________________
Quote:
07 Renault Sport Megane F1 Team R26 #1397
|
|||
|
|
|
|
05-08-2007, 01:47 PM
|
#6 | ||
|
Leeroy
Join Date: Jun 2007
Location: S.E. Melbourne
Posts: 28
|
cheers mate

|
||
|
|
|
|
05-08-2007, 04:04 PM
|
#7 | ||
|
Miami Pilot
 
Join Date: Jan 2005
Location: ACT
Posts: 21,703

|
There's a complete wiring diagram in the AU Technical section. I'll see if I can find a link to the right one.
__________________
-----------------------------------------------------------------
The Hammer: FG GTE | 376rwkw | 1/4 mile 11.793 @ 119.75mph 1.733 60' (4408lb) 1 of 60 FG MK1 335 GTEs (1 of 118 FG Mk 1 & 2 335 GTEs). Mods: Tune, HSD/ShockWorks, black GT335 19 staggered replicas with 245 & 275/35/19 Michelin Pilot sport 5s Daily: BF2 Fairmont Ghia I6 ZF, machine face GT335 19 staggered Replicas with 245s and 275s, Bilsteins & Kings FPV 335 build stats: <click here> Ford Performance Club ACT |
||
|
|
|
|
05-08-2007, 04:05 PM
|
#8 | ||
|
Leeroy
Join Date: Jun 2007
Location: S.E. Melbourne
Posts: 28
|
also could anyone tell me where i might find a front door speaker bracket, so i can put 6" speakers where the stock speakers were.
|
||
|
|
|
|
05-08-2007, 04:08 PM
|
#9 | |||
|
Miami Pilot
Join Date: Jan 2005
Location: ACT
Posts: 21,703
|
Quote:
The other option is to make up a template out of 9 or 12mm MDF in the 5X7 shape, with a 6" hole cut into it to fit the speaker.
__________________
-----------------------------------------------------------------
The Hammer: FG GTE | 376rwkw | 1/4 mile 11.793 @ 119.75mph 1.733 60' (4408lb) 1 of 60 FG MK1 335 GTEs (1 of 118 FG Mk 1 & 2 335 GTEs). Mods: Tune, HSD/ShockWorks, black GT335 19 staggered replicas with 245 & 275/35/19 Michelin Pilot sport 5s Daily: BF2 Fairmont Ghia I6 ZF, machine face GT335 19 staggered Replicas with 245s and 275s, Bilsteins & Kings FPV 335 build stats: <click here> Ford Performance Club ACT |
|||
|
|
|
|
05-08-2007, 04:10 PM
|
#10 | ||
|
Miami Pilot
Join Date: Jan 2005
Location: ACT
Posts: 21,703
|
Accessory feed is Violet/Red
Battery +ve is Yellow Ground is Black Here's a link to the AU radio wiring diagrams: http://www.fordforums.com.au/photos/...ry.php?cat=665 and here's the diagram: 
__________________
-----------------------------------------------------------------
The Hammer: FG GTE | 376rwkw | 1/4 mile 11.793 @ 119.75mph 1.733 60' (4408lb) 1 of 60 FG MK1 335 GTEs (1 of 118 FG Mk 1 & 2 335 GTEs). Mods: Tune, HSD/ShockWorks, black GT335 19 staggered replicas with 245 & 275/35/19 Michelin Pilot sport 5s Daily: BF2 Fairmont Ghia I6 ZF, machine face GT335 19 staggered Replicas with 245s and 275s, Bilsteins & Kings FPV 335 build stats: <click here> Ford Performance Club ACT |
||
|
|
|
|
05-08-2007, 04:42 PM
|
#11 | ||
|
Leeroy
Join Date: Jun 2007
Location: S.E. Melbourne
Posts: 28
|
thanx
|
||
|
|
|
|
05-08-2007, 05:54 PM
|
#12 | ||
|
FF.Com.Au Hardcore

Join Date: Aug 2006
Location: Salamander Bay
Posts: 5,427
|
get the aerpro adaptors then you can do any cuting there without wrecking the original harness i see so many butchered harnesses and it's easy to avoid
|
||
|
|
|
|
05-08-2007, 08:35 PM
|
#13 | ||
|
Banned
Join Date: Mar 2005
Posts: 419
|
i found using the aeropro harness i got crap earthing and power supply i ended up having to do own relay setup so speakers didnt distort
|
||
|
|
|
|
05-08-2007, 09:15 PM
|
#14 | ||
|
Miami Pilot
Join Date: Jan 2005
Location: ACT
Posts: 21,703
|
I've used the aerpro setup successfully in 4 different AUs, an EF and an EL. It is by far the easiest option. Almost plug and play (definitely plug and play once you join the aerpro adapter to the head unit wiring).
__________________
-----------------------------------------------------------------
The Hammer: FG GTE | 376rwkw | 1/4 mile 11.793 @ 119.75mph 1.733 60' (4408lb) 1 of 60 FG MK1 335 GTEs (1 of 118 FG Mk 1 & 2 335 GTEs). Mods: Tune, HSD/ShockWorks, black GT335 19 staggered replicas with 245 & 275/35/19 Michelin Pilot sport 5s Daily: BF2 Fairmont Ghia I6 ZF, machine face GT335 19 staggered Replicas with 245s and 275s, Bilsteins & Kings FPV 335 build stats: <click here> Ford Performance Club ACT |
||
|
|
|
|
05-08-2007, 10:02 PM
|
#15 | |||
|
All Bran = Regular Member
Join Date: Feb 2006
Location: BrizVegas
Posts: 1,970
|
Quote:
For Leeroy, these are the templates (12mm MDF) I made for my 6 1/2" front splits. 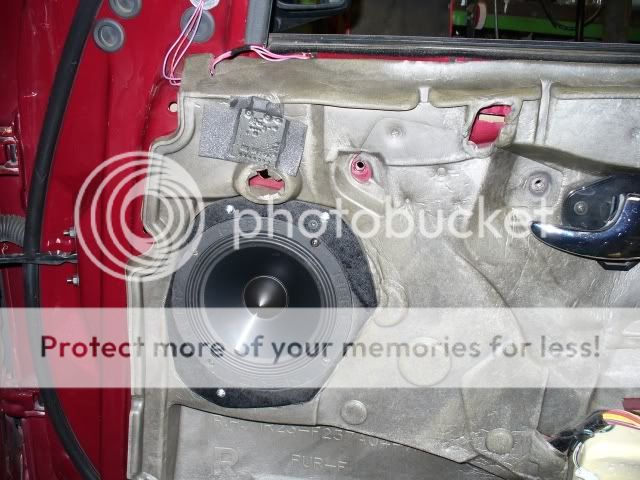 oops, wrong pic but I'll leave it so you can see how they fit. Here's the templates |
|||
|
|
|
|
15-09-2009, 09:09 PM
|
#16 | ||
|
Starter Motor
Join Date: Jun 2009
Posts: 15
|
the wiring diagram for the AU
Violet/Red = Acc 12v+ Yellow = Battery 12v+ Black = Ground Brown = Illumination Dark Blue/Red = Dimming Pink = Mobile Phone Light Blue/Yellow = Mobile Phone Light Green = Mute Dark Green/White = Sat Nav Pink/Orange = Sat Nav Dark Blue = Sat Nav Pink/Black & Pink/Dark Green = LH Rear Dark Blue/Black & Dark Blue/Red = RH Rear Grey/Black & Grey/Dark Green = RH Front Orange/Black & Orange/Light Green = LH Front Red/Dark Blue = Power Antenna Red/White = External Controls (Volume on Steering Wheel) Light Blue/White = Intrument Cluster Red/Black = Instrument Cluster Orange/Black = Instrument Cluster |
||
|
|
|
|
16-09-2009, 05:46 PM
|
#17 | |||
|
THE Fairmont Ghia 75th

Join Date: Jun 2007
Location: S.E Suburbs, Melbourne, Victoria
Posts: 615
|
Quote:
__________________
Current Ride : AUII Fairmont Ghia : 75th Anniversary Limited Edition
Current Mods-HD Built Gearbox+(Mirror Polished, Modified Valve Body), 2500rpm Hi-Stall Convertor(TCE Custom Built), BIG Trans Cooler, Braided Lines/Speedflow Fittings, 2.5" Exhaust, Custom CAI, Detailed UnderCarriage, Custom SQ Stereo Install. My Ride My Build Thread |
|||
|
|
|
|
16-09-2009, 05:57 PM
|
#18 | ||
|
The Monty

Join Date: Oct 2007
Location: Geelong
Posts: 1,226
|
he left out the R LH and R RH
|
||
|
|
|
|
02-10-2009, 11:32 PM
|
#19 | ||
|
Starter Motor
Join Date: Jun 2009
Posts: 15
|
i think its AU2? I can't remember but I just googled it.
but thats all the info it gave me |
||
|
|
|
|
01-12-2009, 09:24 PM
|
#20 | ||
|
WINDSOR

Join Date: Apr 2007
Location: Karratha
Posts: 165
|
Can anyone confirm the part number for me of this famous Aerpro part please?
I'm searching their site and the one I've got is AP1053.... Just want to check its right before I order one. Thanks! Michael |
||
|
|
|
|
02-12-2009, 08:43 AM
|
#21 | |||
|
Van Mad

Join Date: May 2006
Location: Legana, Tasmania
Posts: 181
|
Quote:
|
|||
|
|
|
|
02-12-2009, 10:09 AM
|
#22 | ||
|
WINDSOR
Join Date: Apr 2007
Location: Karratha
Posts: 165
|
Thanks mate.... Already got the fascia just need this harness so I dont have to cut the OEM one.
Cheers Michael |
||
|
|
|


 Linear Mode
